
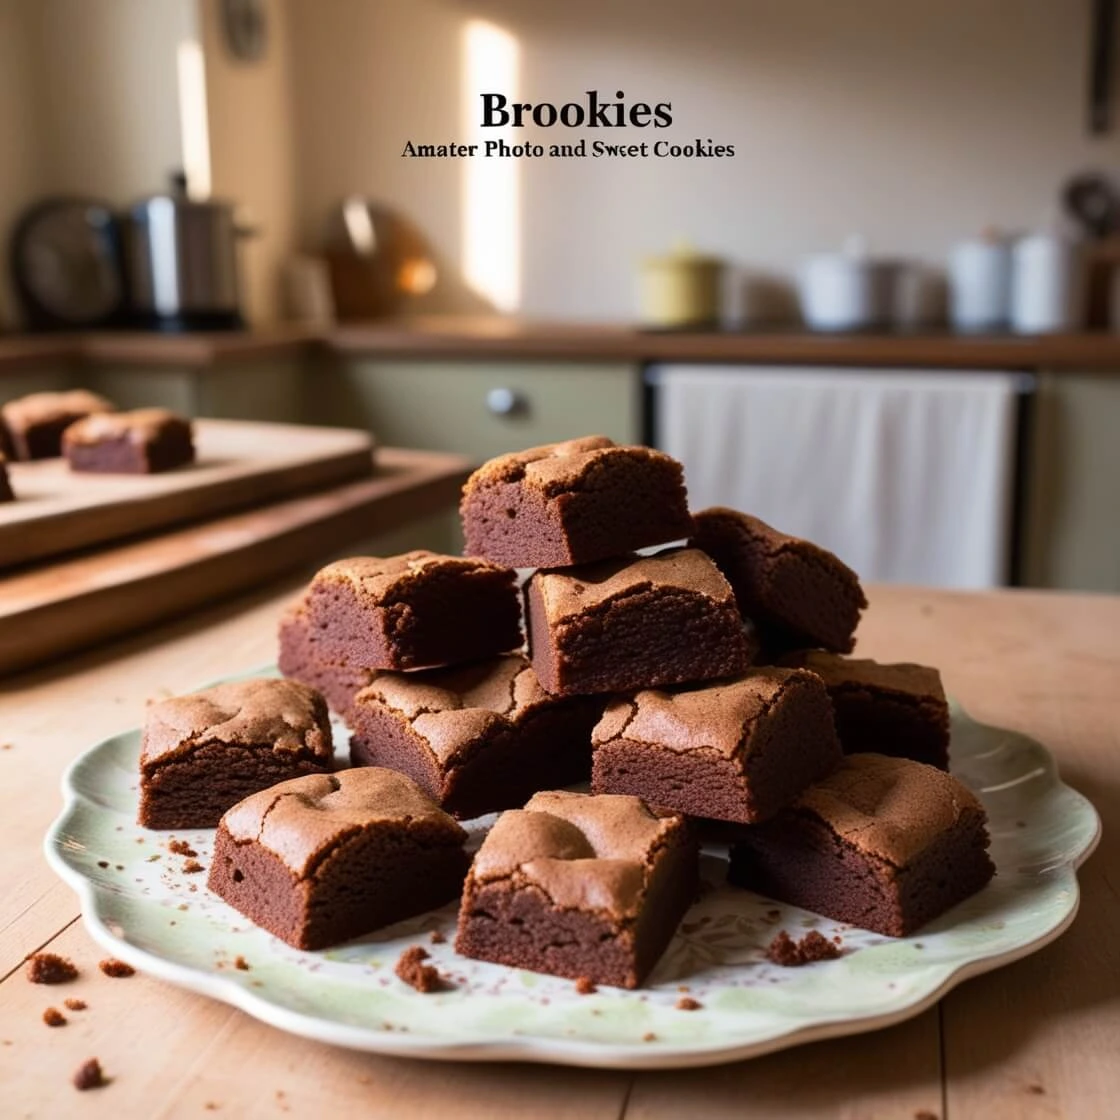
Craving something that’s part brownie, part cookie, and 100% delicious? Say hello to the brookie — the ultimate dessert mashup that combines the rich, fudgy goodness of a brownie with the chewy, buttery bite of a chocolate chip cookie. Whether you’re baking for a party, a cozy night in, or just looking to treat yourself, learning how to make the perfect brookie at home is easier than you think. In this step-by-step recipe, we’ll walk you through everything from gathering ingredients to layering and baking your brookies to golden perfection. Ready to impress your taste buds (and everyone else’s)? Let’s get started!
What is a Brookie and Why You’ll Love It
The Dessert Mashup Everyone’s Talking About
If you’ve ever stood in front of your oven debating between baking a batch of brownies or a tray of cookies, brookies are the answer you didn’t know you needed. A brookie is the best of both dessert worlds — a layered treat that starts with a rich, chocolatey brownie base and is topped (or swirled) with soft, chewy chocolate chip cookie dough. It’s a mouthwatering combination that brings together two iconic sweets into one unforgettable bite.
What makes brookies so irresistible is the contrast in textures and flavors. The brownie layer is dense, fudgy, and packed with deep cocoa flavor, while the cookie layer adds buttery, slightly crisp edges and gooey chocolate chips. This dual experience in every bite is what has made brookies a viral sensation on food blogs, TikTok, and Instagram.
Brookies aren’t just a trend—they’re a timeless crowd-pleaser. They’re fun to make, visually appealing with their marbled layers, and incredibly satisfying to eat. Whether you’re a die-hard chocolate lover, a cookie fanatic, or just looking for a new dessert to wow your family, this mashup is one you’ll want to bake again and again.
Brookies vs. Brownies and Cookies
So what sets brookies apart from classic brownies and cookies? While each of these desserts shines on its own, brookies offer the best of both — and the experience is greater than the sum of its parts.
Let’s break it down:
- Brownies are known for their dense, fudgy texture and intense chocolate flavor. Whether you prefer them cakey or gooey, brownies are rich and satisfying, often with a slightly crackled top and a soft, almost melt-in-your-mouth center.
- Cookies, on the other hand, especially classic chocolate chip cookies, bring a buttery sweetness, chewy texture, and those irresistible crisp edges. They’re portable, versatile, and easy to customize with mix-ins like nuts, candy, or even sea salt.
Now, enter the brookie — a genius dessert hybrid that combines both of these fan-favorites. With a brookie, you get that thick, chocolatey brownie base and a golden, chewy cookie layer baked right on top. The contrast in textures makes every bite exciting: fudgy richness from the brownie, balanced by the soft, sweet cookie dough and occasional bursts of melted chocolate chips.
Beyond taste and texture, brookies are also visually appealing. Their layered or swirled appearance adds a homemade charm that makes them perfect for bake sales, parties, or even gifting. They also offer a built-in variety — one dessert, two flavors — which is perfect when you can’t decide what to make.
In short, if brownies are indulgent and cookies are comforting, brookies are the fun, flavorful fusion that satisfies both cravings in a single bite.
Why Brookies Are Perfect for Home Baking
Brookies aren’t just delicious — they’re one of the most satisfying and beginner-friendly desserts you can make in your own kitchen. If you love the idea of baking but don’t want to tackle anything too complicated or time-consuming, brookies check all the right boxes. Here’s why they’re the perfect choice for home bakers:
✅ Easy Ingredients, No Fuss
Most brookie recipes call for basic pantry staples you likely already have: flour, sugar, eggs, butter, cocoa powder, vanilla extract, and chocolate chips. There’s no need to hunt down specialty ingredients or make a last-minute grocery run. Whether you’re using boxed brownie mix and pre-made cookie dough, or making both layers from scratch, the process is totally flexible.
✅ Two Desserts in One
One of the best things about brookies is their versatility. You don’t have to choose between baking brownies or cookies — you get both in a single batch. This makes brookies a great crowd-pleaser, especially for families, potlucks, and parties where everyone has different preferences. They also save you time by combining two baking projects into one.
✅ Forgiving and Fun to Customize
Brookies are very forgiving when it comes to baking — even if your brownie or cookie layer isn’t perfect, the combination still turns out delicious. Want to get creative? You can easily add extras like walnuts, caramel swirls, peanut butter chips, or even a sprinkle of sea salt on top. The recipe is simple enough for beginners, but fun and adaptable enough for experienced bakers to experiment with.
✅ No Fancy Equipment Needed
If you have a mixing bowl, a spoon or spatula, and an oven, you’re good to go. You don’t need a stand mixer or baking scale — though they’re helpful, they’re not required. Brookies can be made in a standard 8×8 or 9×13-inch baking pan, and you can even portion them into muffin tins for individual servings.
✅ Perfect Make-Ahead Treat
Brookies store well and actually taste even better the next day, once the flavors have had time to meld. They’re easy to pack in lunches, share with friends, or freeze for later. That makes them a perfect make-ahead dessert — ideal for busy schedules or last-minute guests.
In short, brookies combine simplicity, versatility, and irresistible flavor, making them a top choice for anyone looking to bake something special without the stress.
Ingredients and Tools You’ll Need
Pantry Ingredients for Brookies
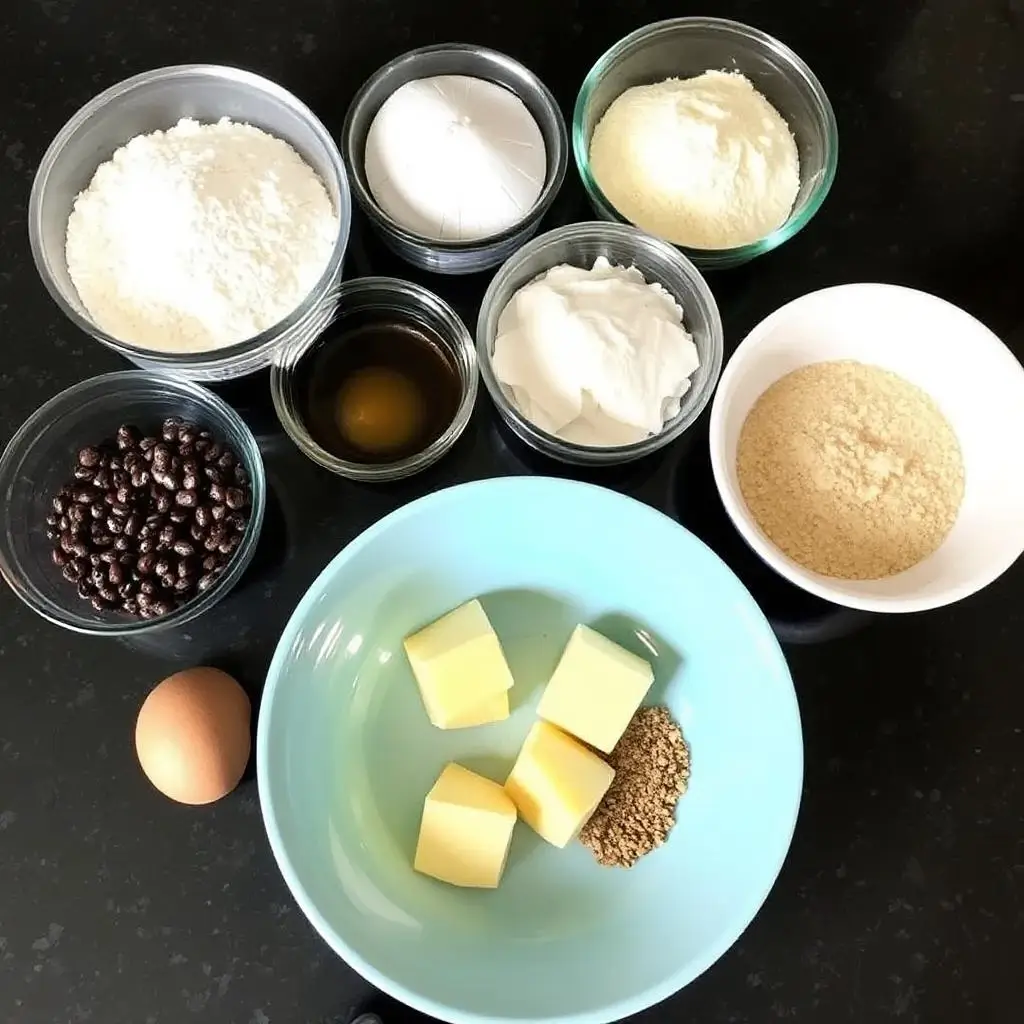
The best part about making brookies is that you don’t need a lot of fancy or hard-to-find ingredients. With just a few pantry staples, you’ll have everything you need to bake up these delicious dessert mashups. Here’s a breakdown of the key ingredients for the brownie and cookie layers:
1. All-Purpose Flour
Flour serves as the foundation for both the brownie and cookie layers. All-purpose flour is ideal for giving the right structure and texture to the desserts. It provides the necessary bulk and helps bind the ingredients together, ensuring that your brookies hold their shape once baked.
2. Cocoa Powder (for Brownies)
For the brownie layer, unsweetened cocoa powder is essential. It adds a rich, deep chocolate flavor and gives the brownies their signature fudgy texture. Cocoa powder creates that moist, melt-in-your-mouth consistency that makes brownies so irresistible. Be sure to use high-quality cocoa powder for the best results!
3. Baking Powder and Baking Soda
While baking powder is used in the cookie dough to help it rise and become light and fluffy, baking soda can be used in either layer to promote leavening. Both are crucial for achieving the right texture: the baking powder helps the cookies become soft and chewy, while the baking soda enhances the overall flavor and contributes to that perfect, slightly crisp edge.
4. Sugar (Granulated and Brown)
A combination of granulated sugar and brown sugar helps create the perfect sweetness balance in both layers. Granulated sugar provides sweetness and texture to the cookie dough, while brown sugar adds moisture, richness, and a hint of caramel-like flavor to the brownie batter. The brown sugar is particularly important for the chewy, gooey consistency of the cookie layer.
5. Butter (Unsalted)
Both the brownie and cookie layers require unsalted butter, which helps achieve the desired soft, rich, and melt-in-your-mouth texture. Butter brings flavor and moisture, and the slight saltiness from unsalted butter will prevent the dessert from becoming too sweet. Always make sure to use softened butter for easy mixing.
6. Eggs
Eggs play a crucial role in binding the ingredients together and providing structure. In the brownie layer, eggs help create the rich, fudgy texture that makes brownies so decadent. In the cookie dough, they provide moisture and ensure the dough holds together well without falling apart. Room temperature eggs are ideal, as they mix more evenly into the batter.
7. Vanilla Extract
Vanilla extract is the secret ingredient that enhances the flavor of both the brownie and cookie layers. It adds a warm, aromatic sweetness that complements the rich cocoa and buttery flavors. A teaspoon of vanilla extract is all you need to elevate the flavor profile of both layers and bring everything together.
8. Chocolate Chips (Semisweet or Milk Chocolate)
Chocolate chips are a must-have for the cookie dough layer, but you can also add them to the brownie layer for an extra dose of chocolatey goodness. Semisweet or milk chocolate chips work best, depending on your preference for sweetness. You can even use dark chocolate chips if you prefer a more intense chocolate flavor, or mix and match different types of chocolate for variety.
9. Salt
A pinch of salt is often used in both the brownie and cookie layers to enhance the flavor of the sweet ingredients. Salt acts as a flavor enhancer, balancing out the sweetness and drawing out the richness of the chocolate. It also helps to create a more complex, well-rounded taste.
Optional Add-ins (for customization)
- Nuts: Add some chopped walnuts, pecans, or almonds to either layer for extra crunch and flavor. Nuts also pair well with both the fudgy brownies and chewy cookie texture.
- Caramel or Peanut Butter: A swirl of caramel sauce or peanut butter can take your brookies to the next level. Both can add a delicious layer of richness and contrast to the chocolate flavor.
- Sea Salt: A light sprinkle of flaky sea salt on top of your brookies before baking can help balance the sweetness and give a gourmet touch.
These pantry ingredients come together to create the ideal balance of chewy, fudgy, and crispy textures. Whether you’re making brookies for a special occasion or simply craving a sweet treat, these ingredients will ensure your dessert turns out perfect every time.
Kitchen Tools That Make It Easier
When it comes to baking brookies, the right tools can make your experience much smoother and more enjoyable. While you don’t need a ton of specialized equipment, having a few key kitchen essentials on hand can make all the difference. Here’s a list of tools that will help ensure your brookies come out perfect every time:
1. Mixing Bowls
The foundation of any great baked good starts with mixing the ingredients together. Mixing bowls are essential for both the brownie and cookie layers. You’ll need at least two large bowls: one for the brownie batter and one for the cookie dough. Look for glass or stainless steel bowls for durability and ease of cleaning. Plastic bowls work well too, but avoid overly flimsy options that might flex during mixing.
Pro Tip: Choose bowls with high sides to avoid spills while mixing and to allow for easy stirring without making a mess.
2. Measuring Cups and Spoons
Accurate measurements are crucial in baking, so a good set of measuring cups and measuring spoons are indispensable. For ingredients like flour, sugar, cocoa powder, and baking soda, you’ll need dry measuring cups (usually designed for things like flour and sugar), and for liquids like vanilla extract and eggs, you’ll need liquid measuring cups. Having both types on hand ensures precision for perfect brookies.
Pro Tip: Always level off dry ingredients like flour and cocoa powder with a flat edge for accurate measurements.
3. Electric Mixer or Stand Mixer
While you can mix the brookie batter by hand, using an electric hand mixer or stand mixer will make the process much quicker and easier, especially when working with thicker batters like brownie dough. A stand mixer is particularly useful when making cookie dough since it can easily handle the thicker texture. The paddle attachment on a stand mixer is perfect for mixing dough without overworking it.
Pro Tip: If you don’t have a stand mixer, a handheld electric mixer will suffice, though you’ll need a bit more elbow grease. Using a whisk attachment can help with lighter tasks, like mixing the brownie batter.
4. Spatula or Spoon
Once your batters are ready, you’ll need a sturdy spatula to scrape down the sides of the bowls and ensure you get every bit of batter incorporated. A silicone spatula is ideal because it’s heat-resistant and non-stick, which helps when you’re scraping out thick cookie dough or brownie batter. Additionally, a wooden spoon or rubber spatula can be used to mix ingredients together, especially if you’re working with thicker doughs.
Pro Tip: Use a rubber or silicone spatula to fold the brownie and cookie layers together for a smooth consistency without overmixing.
5. Baking Pan
The key to a perfectly baked brookie is using the right size baking pan. An 8×8-inch square pan is ideal for thicker layers and a smaller batch of brookies. However, if you want to make a larger batch or prefer a thinner brookie, you can use a 9×13-inch rectangular pan. You’ll want a metal or glass pan for even heat distribution. Some bakers even opt for a nonstick pan to make sure the brookies come out easily after baking.
Pro Tip: Line the pan with parchment paper before pouring in the batter to ensure easy removal once baked. Simply lift the paper to pull out your brookies in one piece.
6. Parchment Paper
Using parchment paper to line your baking pan is a game-changer. Not only does it prevent your brookies from sticking, but it also makes cleaning up easier. When using parchment paper, you can simply lift the paper out of the pan after baking to get perfect, even slices.
Pro Tip: To keep parchment paper in place, lightly grease the pan before laying the paper down, or crumple the parchment paper first to make it more pliable.
7. Cooling Rack
After baking, it’s important to let your brookies cool completely before cutting them into squares or slices. A cooling rack allows air to circulate around the entire dessert, preventing the bottoms from getting soggy. If you don’t have a cooling rack, you can use a clean countertop, but a rack will ensure even cooling and help maintain the texture of the brookies.
Pro Tip: Don’t skip cooling — allowing the brookies to cool for at least 15-20 minutes will help them firm up and prevent the layers from falling apart when you cut them.
8. Knife or Pizza Cutter for Slicing
Once your brookies have cooled, you’ll need a sharp knife to slice them into neat squares or rectangles. A serrated knife works best for cutting through the fudgy brownie layer without squishing it. Alternatively, if you want to cut your brookies into smaller, uniform pieces, a pizza cutter can do the job quickly and with minimal mess.
Pro Tip: If the brookies are still a bit warm, run a knife under hot water before slicing. This makes cutting much smoother and less sticky.
9. Oven Thermometer
To get the perfectly baked brookie, your oven needs to be at the right temperature. While most ovens come with built-in thermometers, they’re not always accurate. A separate oven thermometer can help you ensure the temperature is correct and prevent your brookies from overbaking or underbaking.
Pro Tip: If you find your oven runs hot, consider lowering the temperature by 10-15°F to avoid overbaking your brookies, especially in the center.
With these essential tools, you’ll have everything you need to make your brookies effortlessly and efficiently. Whether you’re a seasoned baker or a beginner, using the right equipment can make a world of difference in your baking experience. Happy baking!
Optional Add-Ins to Customize Your Brookie
One of the best things about making brookies at home is how customizable they are! While the basic recipe is already a winner, adding your own mix-ins can elevate your brookies and give them a unique twist. Here are some optional add-ins to take your brookie creation to the next level:
1. Chopped Nuts
For those who enjoy a bit of crunch alongside their fudgy brownies and chewy cookies, chopped nuts are the perfect addition. Walnuts, pecans, almonds, or even macadamia nuts can add texture, flavor, and a hint of earthiness to your brookies. Nuts pair beautifully with both chocolate and caramel, enhancing the overall richness of the dessert.
- How to add: Simply fold in a handful of your favorite nuts into either the brownie or cookie batter (or both!) before layering them together.
- Pro Tip: Toasting the nuts lightly in a pan for 5-10 minutes enhances their flavor and crunch.
2. Peanut Butter Swirls or Chips
For an extra dose of indulgence, try adding a peanut butter swirl or peanut butter chips to your brookies. The creamy, nutty flavor of peanut butter complements the chocolatey brownie and cookie layers perfectly, creating a mouthwatering combination.
- How to add: If using peanut butter chips, fold them into the cookie dough layer. For a swirl, gently heat peanut butter in the microwave until it softens, then drop spoonfuls of it over the batter and use a knife to swirl it through.
- Pro Tip: Use creamy peanut butter for the smoothest swirl and best incorporation. For extra richness, combine peanut butter with a touch of caramel sauce.
3. Caramel Bits or Sauce
For those who love a little sweetness and gooey texture, adding caramel bits or a drizzle of caramel sauce can turn your brookies into a luxurious treat. The warm, rich flavor of caramel pairs exceptionally well with both chocolate and cookie dough, adding a hint of buttery sweetness that complements the fudgy and chewy layers.
- How to add: Fold in caramel bits into either batter, or swirl a little caramel sauce through the layers before baking.
- Pro Tip: Avoid overloading with caramel, as it can make the brookies too sweet and difficult to slice. Just a few spoonfuls or bits will create the perfect balance.
4. M&M’s or Candy Pieces
If you’re in the mood for a fun and colorful twist, add M&M’s or your favorite candy pieces to your brookies. The crunchy candy shell and colorful pop can brighten up the dessert, making them an ideal treat for kids’ parties or special occasions. Plus, they bring an additional layer of texture and sweetness.
- How to add: Gently fold in a cup of M&M’s or chopped candy bars like Snickers, Reese’s, or even Oreos to the cookie dough layer. For a touch of extra sweetness, sprinkle some on top of the brookie before baking.
- Pro Tip: For the best results, lightly press the candy pieces into the top of the batter before baking, so they don’t sink into the layers too much.
5. Sea Salt
Adding a sprinkle of sea salt on top of your brookies can help balance the sweetness and enhance the chocolatey flavor. The contrast of salty and sweet has become a signature for many gourmet desserts, and brookies are no exception. It also adds an elegant touch, making the brookies look and taste more sophisticated.
- How to add: Once your brookies are done baking and have cooled slightly, sprinkle a small amount of sea salt over the top just before serving. This will allow the salt to melt into the warm dessert and provide a burst of flavor with each bite.
- Pro Tip: Use flaky sea salt for a more delicate texture and milder saltiness. A little goes a long way, so be sure not to overdo it.
6. Shredded Coconut
For a tropical twist, try adding shredded coconut to your brookie dough. Coconut’s natural sweetness and chewy texture work wonderfully with the rich brownie base and the soft cookie layer, giving your brookies a hint of island-inspired flavor.
- How to add: Stir in about ½ cup of shredded coconut into either the brownie or cookie layer, or sprinkle it on top for a bit of texture.
- Pro Tip: If you like a toasted coconut flavor, try toasting the coconut in a pan for a few minutes before adding it to the batter.
7. Chocolate Truffle Pieces or Chunks
For an ultra-decadent treat, you can add chocolate truffle pieces or chunks of your favorite chocolate bars to the brookies. The gooey pockets of chocolate melt into the batter, giving every bite an extra chocolatey kick. This will take your brookies to a whole new level of indulgence.
- How to add: Cut your favorite chocolate truffles or bars into small chunks and fold them into the batter before baking. You can add them to both the brownie and cookie layers for a double dose of chocolatey goodness.
- Pro Tip: Consider using dark chocolate truffles for a slightly less sweet but more intense chocolate flavor.
8. Coffee or Espresso Powder
If you’re a coffee lover, a little bit of instant coffee or espresso powder can enhance the chocolate flavor in your brookies and give them a subtle richness that pairs beautifully with the sweetness of the brownie and cookie layers. The coffee won’t make the brookies taste like coffee, but it will bring out the best in the chocolate.
- How to add: Dissolve a tablespoon of instant coffee or espresso powder in a little hot water and add it to the brownie batter before mixing.
- Pro Tip: Make sure to mix the coffee thoroughly into the batter to avoid any pockets of bitterness.
9. White Chocolate Chips
For a creamy contrast to the semisweet or milk chocolate, try adding white chocolate chips to your brookies. The sweet, buttery flavor of white chocolate complements both the rich brownie and the chewy cookie dough, giving your brookies a lighter, creamier edge.
- How to add: Simply fold in about ½ cup of white chocolate chips into the cookie dough or brownie batter before baking.
- Pro Tip: Pair white chocolate chips with other mix-ins like macadamia nuts for a luxurious combination of flavors and textures.
Final Thoughts on Add-Ins
The beauty of brookies is that they can be completely tailored to suit your tastes or the occasion. Whether you’re craving something decadent, nutty, fruity, or even a little salty, these add-ins will transform your brookies into something extraordinary. So don’t be afraid to get creative and experiment with different flavors to create your own signature brookie!
Easy Step-by-Step Brookie Recipe
Step 1 – Make the Brownie and Cookie Batters
The first step to making the perfect brookie is preparing the brownie and cookie batters. While this process may seem simple, it’s crucial to get each batter just right to achieve that perfect combination of gooey brownies and chewy cookies. Here’s how to do it:
Making the Brownie Batter
- Prepare the Wet Ingredients
Start by melting the unsalted butter in a microwave-safe bowl or over low heat on the stove. You can also use a double boiler to melt the butter gently if you prefer. Once the butter is melted, stir in the granulated sugar and brown sugar. The mixture should be smooth and well combined, with no lumps of sugar remaining. After the sugars are incorporated, whisk in the eggs one at a time, followed by the vanilla extract. The eggs should be at room temperature for easier mixing and better consistency. Whisk until the mixture is smooth, and the sugar has completely dissolved into the butter. - Incorporate the Dry Ingredients
Sift together the all-purpose flour, unsweetened cocoa powder, and baking powder (if using) to prevent clumps and ensure an even distribution of dry ingredients. Gradually fold the dry mixture into the wet ingredients. Stir gently until the batter is thick, glossy, and smooth. This is where the rich, fudgy texture of the brownies will start to come together. - Add the Chocolate
To take the brownie batter to the next level, fold in the semisweet chocolate chips (or dark chocolate chips if you prefer a more intense flavor). This will give your brownies an extra bit of richness and chocolatey goodness. You can also add a handful of chopped chocolate or chocolate chunks for a more indulgent texture. - Check Consistency
The brownie batter should be thick, dense, and pourable, but not runny. If the batter feels too thick, you can add a splash of milk or water to loosen it slightly, but be cautious not to make it too thin. It should hold its shape when spread in the pan but still be easy to work with.
Making the Cookie Dough
- Cream the Butter and Sugars
In a large bowl, start by creaming the unsalted butter and granulated sugar together. Using a hand mixer or stand mixer, beat the butter and sugar on medium speed until the mixture is light and fluffy. This process will help incorporate air into the dough, which is key for achieving that soft, chewy cookie texture. - Add the Eggs and Vanilla
Beat in the eggs one at a time, ensuring each is fully incorporated before adding the next. Once the eggs are mixed in, add the vanilla extract and beat until smooth. This step helps create a soft, rich dough that will bake up perfectly. - Combine the Dry Ingredients
In a separate bowl, whisk together the all-purpose flour, baking soda, and salt. Sifting the dry ingredients is crucial here, as it ensures that the baking soda is evenly distributed, which will help the cookies rise evenly during baking. Gradually add the dry ingredients to the wet ingredients, mixing until the dough comes together. Be careful not to overmix; once the flour is incorporated, stop. - Add the Chocolate Chips (and Optional Mix-ins)
Gently fold in the chocolate chips or any other mix-ins, such as M&M’s, caramel bits, or chopped nuts. Make sure the chips are evenly distributed throughout the dough, but avoid overworking it, as that can result in tough cookies. The dough should be thick and easy to scoop. - Adjust Consistency if Needed
The cookie dough should be thick enough to hold its shape but soft enough to spread slightly in the pan. If the dough feels too soft, you can chill it in the fridge for about 30 minutes to make it firmer and easier to handle. However, if the dough seems too dry or crumbly, add a tablespoon of milk at a time until it reaches the right consistency.
Pro Tip: Layering Both Batters Together
Once you have both batters prepared, you’re ready for the fun part: assembling your brookies. Here’s how to layer them properly:
- Start with the brownie layer: Spread the brownie batter evenly in the prepared baking pan. Use a spatula to smooth it out, ensuring it covers the entire base of the pan. If you like a thicker brownie base, use less of the cookie dough; for a more balanced ratio, use an equal amount of each batter.
- Top with the cookie dough: After you’ve spread out the brownie layer, carefully scoop and dollop the cookie dough on top. Gently spread the dough over the brownie layer with a spatula or your fingers. Don’t worry if it’s not perfectly smooth — the two layers will meld together as they bake. You want the cookie dough to cover most of the brownie batter, but it’s okay if some brownie edges peek through.
- Swirl for a Marbled Effect (Optional): If you want to get creative, you can gently swirl the two batters together using a knife or toothpick. This will create a marbled effect, where some areas have more cookie dough, and others have more brownie batter, making for a visually appealing dessert.
Final Thoughts on Preparing the Batters
By carefully preparing the brownie batter and cookie dough, you set the foundation for a perfectly balanced brookie. The brownie layer should be rich and fudgy, while the cookie dough needs to be chewy with the right amount of structure to hold up against the brownie. Once you’ve perfected these steps, you’re well on your way to creating a decadent and irresistible dessert!
Step 2 – Layering and Baking Your Brookie
Now that you have your brownie batter and cookie dough ready, it’s time to layer them together and bake them to perfection! The right technique for layering the batters is crucial to achieving that perfect balance of fudgy brownie and chewy cookie. Let’s go step by step through the process to ensure your brookies come out perfectly baked, with a beautiful, gooey center and crispy edges.
Layering the Brownie and Cookie Batters
- Prepare Your Pan
Before layering the batters, it’s important to properly prepare your baking pan. For brookies, a 9×9-inch square pan is typically ideal, though you can use an 8×8-inch pan if you want thicker layers. Lightly grease the pan with butter or cooking spray to prevent sticking, and then line it with parchment paper for easy removal. Leave a bit of overhang on the sides so you can easily lift out your brookies once they’ve cooled.- Tip: Greasing the pan before placing the parchment paper helps it stay in place while you pour the batter.
- Spread the Brownie Batter
Begin by adding your prepared brownie batter to the bottom of the pan. Use a spatula or spoon to evenly spread the batter out into all corners of the pan. Make sure the brownie layer is relatively even to avoid uneven baking, which can result in some parts of the brownie being undercooked.- Pro Tip: If your brownie batter is too thick, you can use the back of a spoon or a small offset spatula to smooth it out. Don’t rush this step — a smooth base helps ensure that the layers bake evenly.
- Top with the Cookie Dough
Now that the brownie layer is set, it’s time to add the cookie dough. Since cookie dough can be thick and a bit more challenging to spread evenly, start by dropping spoonfuls of the dough onto the brownie layer. Space out the dough so it covers as much of the brownie batter as possible, but don’t worry if it’s not perfect. Some brownie edges may peek through, and that’s totally fine — it’ll bake together beautifully.- Pro Tip: If the cookie dough is too sticky to work with, try lightly wetting your hands or using a greased spatula to spread it without sticking. Alternatively, you can chill the dough in the fridge for 15–30 minutes to firm it up before layering.
- Spread the Cookie Dough
After dropping spoonfuls of dough, gently spread the cookie dough over the brownie layer with your spatula or the back of a spoon. You don’t need to completely cover the brownie layer, but make sure the cookie dough is distributed fairly evenly across the top. If you like, you can press the cookie dough down lightly to help it stick to the brownie batter.- Tip: If you want a more even look, use your fingers to press the dough into a smooth layer, ensuring it’s somewhat even on top of the brownie base.
- Add Extra Toppings (Optional)
If you’re feeling creative or want to add extra indulgence, you can sprinkle some chocolate chips, M&M’s, chopped nuts, or even a few more dollops of caramel sauce on top of the cookie dough. These toppings will melt into the brookies during baking, adding an extra layer of texture and flavor. You can also sprinkle a tiny bit of sea salt on top for that perfect salty-sweet balance.- Pro Tip: Don’t add too many toppings, as they might interfere with the batter’s ability to bake properly. Just a light sprinkle will do!
Baking the Brookies
- Preheat Your Oven
Before you start baking, preheat your oven to the specified temperature — typically 350°F (175°C). Preheating ensures that the brookies bake evenly from the moment they hit the oven. Always allow your oven to fully preheat before placing the pan inside for the best results.- Pro Tip: If your oven tends to run hot or unevenly, consider using an oven thermometer to make sure the temperature is accurate. This will help prevent overcooking or undercooking your brookies.
- Bake the Brookies
Place the assembled brookie pan into the preheated oven on the middle rack for even heat distribution. Bake for about 25-30 minutes, but keep an eye on them, as oven temperatures can vary. At around the 20-minute mark, begin checking the brookies for doneness.- Tip: The brookies are done when the edges appear golden brown and firm to the touch, but the center should still feel slightly soft. You can check for doneness by inserting a toothpick into the center of the brookie — it should come out with a few moist crumbs but not with raw batter.
- Avoid Overbaking
One of the biggest mistakes when baking brookies is leaving them in the oven for too long. Since the brownie layer is rich and fudgy, it can look slightly undercooked even when it’s done. If you wait until the toothpick comes out completely clean, you might end up with overbaked brookies that lose their fudgy texture.- Pro Tip: If the center still looks a bit jiggly after 25 minutes, don’t worry — the brookies will continue cooking in the pan after you take them out. Let them rest for 10-15 minutes before slicing, which will allow the layers to firm up and make cutting easier.
- Cool the Brookies
Once you’ve pulled your brookies from the oven, let them cool in the pan for about 10 minutes before transferring them to a cooling rack to finish cooling. This ensures they don’t fall apart when you try to cut them. The cooling period helps set the layers, so the brookies hold their shape and are easier to slice.- Tip: If you’re eager to eat them, you can let them cool for a shorter time (around 5 minutes) and enjoy them warm, but be careful when cutting, as they’ll be a bit softer.
- Slice and Serve
Once the brookies have cooled for about 15-20 minutes, you can carefully lift them from the pan using the parchment paper and place them on a cutting board. Use a sharp serrated knife or pizza cutter to slice them into squares or rectangles. The warm center may be a bit gooey, so be gentle when cutting.- Pro Tip: Run your knife under hot water between cuts to ensure smooth, clean slices. This will help preserve the layers of brownie and cookie, keeping them intact without smudging.
Final Thoughts on Layering and Baking Your Brookie
Layering and baking your brookies might seem like a simple process, but the technique you use plays a huge role in the final texture and flavor. By carefully layering the brownie and cookie batters and monitoring the baking time, you’ll ensure that each brookie has the perfect balance of a chewy, sweet cookie and a rich, fudgy brownie. The result is an irresistibly delicious dessert that’s sure to be a hit!
Step 3 – Cooling, Cutting, and Serving
After your brookies have baked to perfection, the final step is to cool, cut, and serve them. While it might be tempting to dive right in while they’re still warm, there are a few important steps to follow to ensure your brookies retain their texture, flavor, and visual appeal. Let’s walk through the process of cooling, cutting, and serving your brookies so they turn out just right!
Cooling the Brookies
- Let the Brookies Rest in the Pan
Once your brookies are out of the oven, they need some time to cool and set. This is especially important because the combination of the chewy cookie layer and fudgy brownie base needs to firm up slightly for the best texture. Allow your brookies to cool in the pan for at least 10–15 minutes before attempting to remove them from the pan or cut them. This cooling period lets both layers stabilize, making them easier to slice without falling apart.- Pro Tip: If you’re in a hurry but still want to avoid a gooey mess, you can let the brookies cool for just 5 minutes in the pan. This will allow the layers to set up a bit but still retain that soft, melt-in-your-mouth quality.
- Transfer to a Cooling Rack
After the initial cooling time in the pan, it’s best to transfer the brookies to a cooling rack to continue cooling. The cooling rack ensures that air circulates around all sides of the brookie, helping them cool evenly. This step also helps prevent the bottom from becoming too soggy or mushy, which can happen if you leave them sitting in the pan too long.- Tip: If you used parchment paper to line your pan, you can easily lift the entire batch of brookies out of the pan by pulling up the paper edges. This makes it much easier to transfer the brookies to a rack without disrupting the layers.
- Allow the Brookies to Cool Completely
While it might be hard to wait, let the brookies cool for at least 30 minutes to 1 hour before cutting into them. Cooling them completely ensures that the layers set properly, making them easier to cut into neat squares or rectangles. If you cut them too soon, the center may be too gooey and the brookies may fall apart, making them harder to serve.- Pro Tip: If you’re in a rush and can’t wait for them to cool completely, you can try chilling them in the fridge for 15–20 minutes to speed up the process without compromising the texture too much.
Cutting the Brookies
- Use a Sharp Knife
To get clean, even slices of your brookies, you’ll want to use a sharp serrated knife or a pizza cutter. The serrated edge will help you slice through the fudgy brownie layer and the chewy cookie dough without squashing or smearing the edges.- Pro Tip: If you want to achieve perfectly clean cuts, run your knife under hot water between slices and wipe it dry. This helps prevent the sticky, gooey brownie and cookie layers from sticking to the knife and creating a messy edge.
- Determine Your Portion Size
Brookies are quite rich and indulgent, so you’ll want to cut them into moderate-sized squares. For a more decadent treat, you can opt for larger pieces. A typical 9×9-inch pan can yield about 16 squares, but you can adjust the portion sizes based on your preferences. For smaller servings, you can even cut the brookies into smaller bite-sized pieces or rectangles for easy serving at parties or gatherings.- Tip: If you’re cutting your brookies into smaller squares, you can make cleaner cuts by using a sharp knife and cutting straight down instead of dragging the knife, which could cause the layers to separate.
- Be Gentle While Cutting
Since brookies are a combination of two layers, you’ll want to be gentle while cutting to avoid disturbing the texture. If you press too hard while cutting, you might squish the layers together or cause them to crumble. Instead, use a gentle sawing motion with your knife to cut through the layers slowly.- Pro Tip: If your brookies have a soft center, consider letting them sit for a little longer before cutting, or even refrigerating them briefly to help firm up the layers for cleaner cuts.
Serving the Brookies
- Serve Warm or at Room Temperature
Brookies are delicious both warm and at room temperature. If you want to serve them warm, consider microwaving individual pieces for 10–15 seconds or reheating them briefly in the oven. The warm brookies will be extra gooey and melt-in-your-mouth, with the chocolate chips oozing out of the brownie and cookie layers. However, be mindful not to overheat them, as this can cause the texture to become too soft and sticky.- Tip: For the ultimate treat, serve warm brookies with a scoop of vanilla ice cream or a drizzle of caramel sauce to add an extra level of indulgence.
- Add Toppings for Extra Indulgence
If you’re looking to go all out, consider adding some extra toppings to your brookies. A sprinkle of powdered sugar adds a touch of elegance, while whipped cream, ice cream, or even a drizzle of chocolate syrup can make them even more decadent. These additions not only enhance the flavor but also make the brookies look more enticing for guests or special occasions.- Pro Tip: If you plan to serve your brookies with ice cream, warm the brookies slightly before serving. The combination of warm brookies and cold ice cream is a heavenly match.
- Storage and Make-Ahead Tips
If you have leftover brookies (which is unlikely, but it can happen!), you can store them in an airtight container for up to 3 days at room temperature. If you want to extend their shelf life, store them in the fridge for up to 1 week. To keep them fresh, consider wrapping them in plastic wrap or placing them in an airtight container lined with parchment paper to prevent them from drying out.- Tip: Brookies can also be frozen for up to 3 months. Just wrap them tightly in plastic wrap and then foil, or store them in a freezer-safe container. When ready to enjoy, simply thaw them at room temperature or reheat them in the microwave or oven for a fresh-out-of-the-oven experience.
Final Thoughts on Cooling, Cutting, and Serving Your Brookies
Once your brookies have cooled, cutting them carefully and serving them just right is essential to enjoying their full flavor and texture. Whether you choose to serve them warm or at room temperature, with or without toppings, these brookies are sure to impress. With these tips for cooling, cutting, and serving, you’ll be able to enjoy a perfectly presented dessert that is as beautiful as it is delicious.
Conclusion: How to Make the Perfect Brookie at Home (Easy Step-by-Step Recipe)
In conclusion, making the perfect brookie at home is easier than you might think, and with the right balance of brownie and cookie dough, you can create a dessert that is truly irresistible. By following this easy step-by-step recipe, you can enjoy a decadent treat that combines the rich, fudgy texture of brownies with the chewy, sweet delight of cookies. Whether you’re baking for a special occasion, a family gathering, or simply craving a homemade dessert, these brookies are sure to satisfy every sweet tooth.
With tips for preparing the batters, layering the dough, and baking to perfection, you’ll be able to enjoy a perfectly gooey, indulgent treat every time. The key to success lies in patience — allowing the brookies to cool, cutting them gently, and serving them at the right temperature. Once you’ve mastered this recipe, feel free to experiment with your own mix-ins or toppings to personalize your brookies even more.
So, gather your ingredients, preheat your oven, and get ready to bake up a batch of the most delicious brookies you’ve ever tasted. Enjoy every bite of this fantastic dessert and share the joy with your loved ones!
Happy baking!